 |
|  |
|  |
|  |
| 
E-mail: kobol@jfbathroom.com

Tel: (86)768-2992129


NEWS CENTER
—
What does "toilet rough-in" mean, and how do I measure mine in 2 minutes?
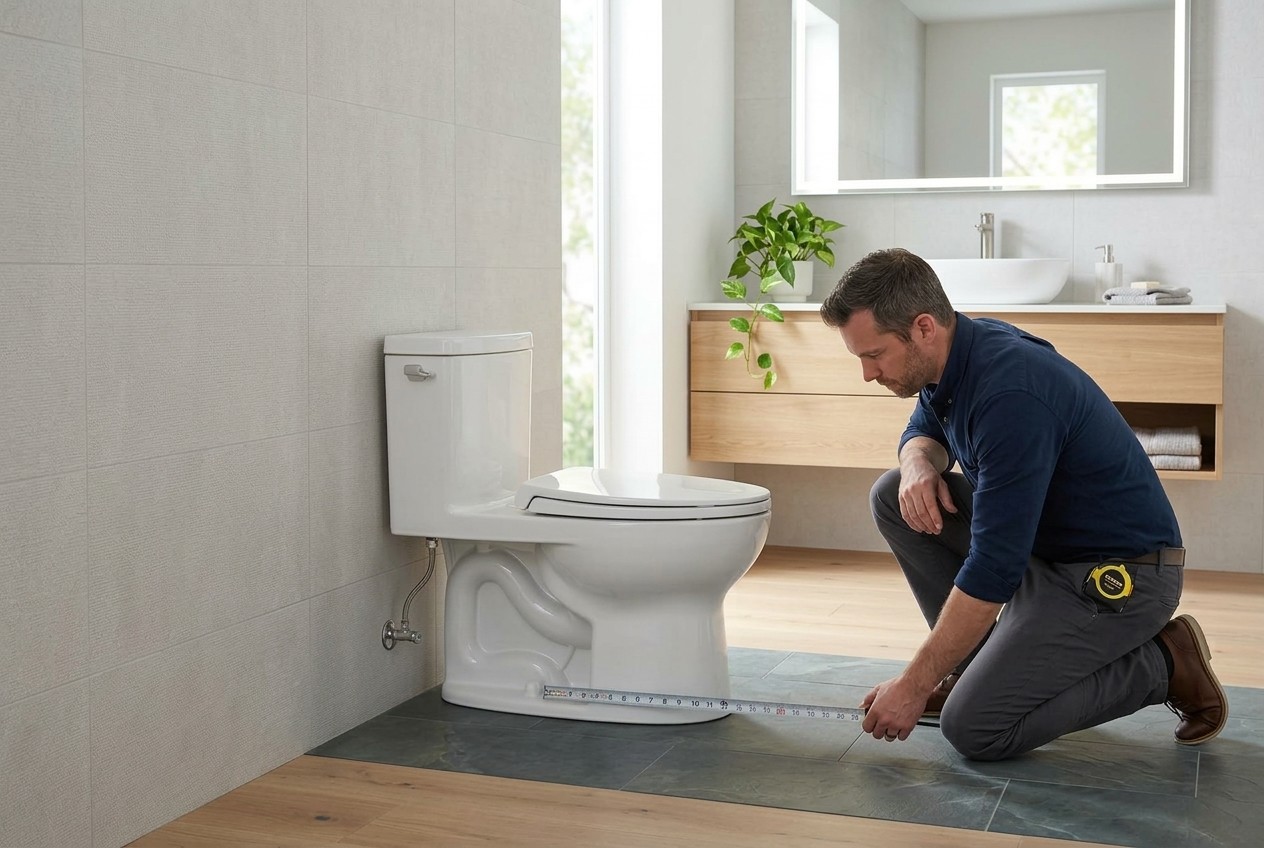
A toilet rough-in is the clearance distance measured from the finished wall behind your toilet to the center of the floor waste pipe (or the center of the closet bolts holding the toilet base). Measuring this dimension accurately is the single most critical step to take before buying a replacement toilet.
At Joy & Fortune, with decades of professional sanitary ware manufacturing experience, we know firsthand that mismeasuring a rough-in is the primary cause of installation failures, product returns, and project delays. Picking the wrong rough-in size means your new toilet will either physically crash into the back wall during installation or leave an awkward, oversized gap behind the tank.
Fortunately, determining your exact rough-in distance takes less than two minutes using simple household tools. In this guide, our engineering team breaks down what toilet rough-ins mean, explains standard industry sizes (10, 12, and 14 inches), provides a step-by-step measuring guide, and helps you select the perfect fixture for your space.

What Is a Toilet Rough-In? (Definitions & Core Concepts)
Before purchasing a new toilet, understanding your toilet rough-in is the single most critical step to ensure a seamless, hassle-free replacement. The rough-in dimension defines the exact spatial requirements between your bathroom wall and the floor drain. In this section, we will break down what the rough-in distance actually measures, explore the three standard industry sizes (10, 12, and 14 inches), and explain why getting this measurement right saves you from costly returns and plumbing headaches.
Defining the Toilet Rough-In Distance
The toilet rough-in distance is the clearance measured from the finished wall behind the toilet to the center of the waste pipe (closet flange) on the floor. In practical terms, it measures the distance from the wall to the center of the bolts securing your toilet.
This dimension determines the spatial envelope required for your toilet fixture. Crucially, measurement must begin at the drywall or tile surface—never the baseboard or decorative trim. Getting this distance right ensures your replacement toilet installs flush without striking the back wall or leaving an unsightly, oversized gap behind the tank.
Standard Rough-In Sizes: 10, 12, and 14 Inches
Residential plumbing relies on three standard rough-in measurements: 12 inches, 10 inches, and 14 inches.
l 12 Inches (Industry Standard): Found in roughly 90% of modern homes. This is the universal default for most off-the-shelf toilet models.
l 10 Inches (Compact & Renovations): Common in older builds, small powder rooms, or tight layouts where space conservation is essential.
l 14 Inches (Historic & Spacious): Typically seen in vintage homes constructed before standardized codes or in larger master bathrooms.
Key Rule: You can install a smaller rough-in toilet (e.g., 10-inch) into a larger space (12-inch), but a 12-inch toilet will not fit a 10-inch rough-in without costly plumbing adjustments.
Why Accurate Rough-In Measurement Matters for Installation
Accurate rough-in measurement is critical to avoid costly installation failures, return fees, and project delays. Toilet fixtures are rigid ceramic units with zero flex; if your measurement is off by even an inch, the closet bolts will not line up with the base holes.
Selecting the wrong size leads to two major issues:
l Too Small: A 12-inch toilet on a 10-inch rough-in physically hits the back wall, preventing bolt alignment and proper drain seating.
l Too Large: Installing a 10-inch toilet on a 14-inch clearance leaves an unsightly, unstable gap behind the tank that exposes hardware.
Getting it right upfront guarantees a seamless, flush installation without expensive plumbing modifications.

How to Measure Your Toilet Rough-In in Under 2 Minutes
Measuring your toilet rough-in doesn’t require a plumber or technical expertise—in fact, you can get an accurate measurement in under two minutes using basic household items. Whether you are replacing a standard floor-mounted toilet or dealing with a specialized corner or rear-discharge fixture, getting exact numbers is straightforward. In this section, we will cover the essential tools to gather before starting, provide a clear step-by-step guide from wall to bolt center, and detail how to measure unique layout configurations.
Essential Tools Needed Before You Measure
Measuring your toilet rough-in requires zero specialized plumbing equipment. Gathering a few basic household tools beforehand ensures you complete the job accurately in under two minutes:
Standard Tape Measure: A retractable metal tape measure provides the rigidity needed for precise straight-line measuring.
l Flashlight or Phone Light: Illuminates the dark base area to clearly locate the plastic bolt caps covering your closet bolts.
l Notepad or Phone: Essential for recording your exact numbers immediately before you forget.
l Masking Tape (Optional): Helps mark straight reference points if thick tile work or baseboard trim creates confusion.
Having these simple items ready keeps your replacement project moving without unnecessary interruptions.
Step-by-Step: Measuring Floor-Mounted Toilets from the Finished Wall
Measuring your standard floor-mounted toilet rough-in takes under two minutes following these simple steps:
l Locate the Closet Bolts: Find the plastic caps on either side of the toilet base that anchor the fixture to the floor flange.
l Measure from the Wall: Place your tape measure against the finished wall (drywall or tile) directly behind the toilet. Do not measure from the baseboard or trim.
l Extend to the Bolt Center: Pull the tape straight to the center of the closet bolt cap.
l Round to Standard: Match your number to the nearest standard size—10, 12, or 14 inches.
Measuring Specialized Models: Corner and Rear-Discharge Toilets
Non-standard toilets require alternative measurement reference points:
l Corner Toilets: Measure diagonally from the corner where the two finished walls meet straight to the center of the closet bolt on the floor.
l Rear-Discharge Toilets: Instead of floor clearance, measure vertically from the finished floor up to the center of the drain pipe exiting the wall (typically 4 or 7 inches).
l Wall-Hung Models: Measure vertically from the finished floor to the center of the mounting bolts anchoring the concealed wall carrier frame.
Verifying these unique diagonal or vertical dimensions guarantees your specialized fixture aligns perfectly with existing plumbing connections.

Common Measurement Mistakes to Avoid
Even though measuring a toilet rough-in takes only a few moments, small oversight errors can lead to purchasing a fixture that simply will not fit. Misjudging reference points or wall boundaries can throw off your total distance by critical fractions of an inch. In this section, we will cover the most frequent measurement mistakes homeowners and DIYers make—including measuring from baseboards, misreading closet bolt centers, and failing to account for unfinished drywall or tile installations—so you can get a 100% accurate measurement before buying.
Measuring from the Baseboard or Trim Instead of the Wall
The most common mistake when measuring a toilet rough-in is starting your tape measure from the baseboard, shoe molding, or tile trim instead of the wall itself. Standard rough-in specifications are calculated strictly from the finished wall surface (drywall or tile).
Baseboards add 0.5 to 1 inch of thickness. Measuring from the trim artificially reduces your recorded clearance, which might trick you into buying a 10-inch toilet when a standard 12-inch model actually fits. To avoid this error, hold your tape measure against the flat drywall surface directly above the baseboard and extend it straight to the center of the closet bolt.
Misidentifying Closet Bolt Locations on Floor Flanges
Another frequent error is misidentifying the true center of the closet bolts securing your toilet flange. Standard floor flanges hold two bolts positioned directly opposite each other, perfectly aligned with the centerline of the drain pipe.
However, decorative plastic bolt caps can shift or get bumped over time. Measuring to the edge of a crooked cap rather than the center of the bolt beneath creates small but critical discrepancies. Furthermore, if your toilet base features four bolt caps, only the rear set aligns with the drain pipe centerline. Always measure straight to the center of the primary flange bolts to ensure accurate waste pipe alignment.
How Unfinished Drywall or Tile Remodeling Affects Your Numbers
Measuring during a full bathroom renovation introduces a major trap: measuring against bare studs or unfinished walls. Rough-in dimensions are strictly calculated from the final finished wall surface.
If you measure from exposed studs before drywall or tile installation, you must subtract the thickness of your future wall materials. Standard drywall adds 1/2 inch, while tile and backer board can add another 1/2 inch or more.
Failing to account for these added layers will make your rough-in distance seem up to an inch larger than it actually will be once finished. This miscalculation often leads to buying a 12-inch toilet that physically cannot fit after tiling.

Choosing the Right Toilet After Taking Your Measurement
Once you have determined your rough-in measurement, choosing the right replacement toilet becomes a straightforward process. Matching your recorded distance to the correct fixture ensures a hassle-free installation, optimal aesthetics, and reliable plumbing performance. In this section, we will explore your best buying options for standard 12-inch layouts, compact 10-inch spaces, and vintage 14-inch configurations—including modular adapters and offset flange solutions.
Fitting the Standard 12-Inch Rough-In Model
If your measurement comes out to roughly 12 inches (typically between 11.5 and 12.5 inches), you have the industry-standard rough-in. This gives you access to the widest selection of toilet fixtures on the market, ranging from budget-friendly two-piece models to sleek one-piece units and feature-packed smart toilets.
Shopping for a 12-inch model is straightforward, as nearly every manufacturer prioritizes this dimension. You will benefit from competitive pricing, endless style options, and quick drop-in installation. Simply choose your preferred bowl shape (elongated vs. round front) and flushing technology without worrying about tight clearance issues or expensive plumbing adjustments.
Solutions for Compact Spaces with 10-Inch Rough-Ins
Measuring around 10 inches means you need a dedicated 10-inch rough-in toilet. While selection is slightly smaller than standard 12-inch models, major manufacturers offer high-performance 10-inch options tailored for compact powder rooms and tight renovations.
If you want a specific design, look for modular or skirted toilets that feature adapter kits. These specialized trapway converters allow a single toilet model to adjust seamlessly between 10, 12, and 14-inch configurations without costly plumbing relocations.
Never attempt to force a standard 12-inch toilet into a 10-inch space. Investing in a dedicated 10-inch fixture guarantees proper wall clearance, easy bolt alignment, and a leak-free seal on your waste flange.
Options and Offset Adapters for Older Homes with 14-Inch Rough-Ins
Measuring 14 inches is common in vintage homes and spacious master bathrooms. If your measurement reads 14 inches, you have three reliable solutions:
l Dedicated 14-Inch Toilets: These units sit flush against the wall, though design selections are more limited and slightly costlier.
l Standard 12-Inch Toilets: A standard 12-inch model will bolt onto a 14-inch flange without issue, but it leaves an extra 2-inch gap behind the tank.
l Offset Flanges & Adapters: Using an offset toilet flange or a skirted toilet with a modular trapway adapter lets you shift the bowl position closer to the wall without expensive repiping.

Taking two minutes to measure your toilet rough-in is the easiest way to guarantee a flawless, stress-free bathroom installation. By measuring straight from your finished wall to the center of the closet bolts, you eliminate guesswork and ensure your new fixture fits comfortably—whether your space requires a standard 12-inch, compact 10-inch, or historic 14-inch model.
At Joy & Fortune, we draw on over three decades of sanitary ware manufacturing expertise to engineer ceramic toilets, smart bidets, and custom fixtures crafted for precise installation and long-term durability. Every fixture undergoes high-temperature vitrification to deliver exceptional strength, leak-free performance, and seamless alignment with standard plumbing specifications. Whether you are sourcing OEM/ODM sanitary solutions for a large-scale commercial development or selecting fixtures for residential renovations, starting with an accurate rough-in measurement ensures a perfect fit every time. Explore our catalog of high-efficiency toilets or contact our team today for expert product guidance.
Related news
-

Public bidets vs. traditional toilet paper: Which is hygienic in a shared restroom
Stepping into a high-traffic shared restroom often comes with a subtle hesitatio
-
What are the best toilet brands for reliability, durability, and budget?
Few fixtures in your home work harder or impact your daily comfort more than the
-
How do I measure my old toilet to make sure the new replacement fits perfectly
Upgrading your bathroom with a modern fixture should be an exciting renovation—n
-
What does "toilet rough-in" mean, and how do I measure mine in 2 minutes?
A toilet rough-in is the clearance distance measured from the finished wall behi
-
Why are cheap bathroom vanities so cheap? Hidden traps like low-grade particle board and missing tops.
At first glance, an ultra-low price tag on a brand-new bathroom vanity feels lik
-
Big-box home store vs. online discount retailers: Where do you get the best deal on bathroom vanities?
Upgrading your bathroom vanity is one of the most impactful choices in any renov



Premium sanitary ware manufacturer since 1992. Delivering reliable global B2B solutions.


Contact
Address: No. 12, Guayuan East Road, Changmei Second Village, Fengxi District, Chaozhou City, Guangdong Province, China
Email: kobol@jfbathroom.com
WhatsApp/Tel: [+86-135-3399-8998]
Working Hours: Mon - Sat: 9:00 AM - 6:00 PM (UTC+8)
Copyright © 2026 Joy&Fortune Ltd. All Rights Reserved.


